Friday, August 12, 2022

Double Review: Camp Cretaceous and Multiverse of Madness

 I'm doing two reviews today so let's start with the child-friendly one: 

Jurassic World: Camp Cretaceous.

Summary: I liked it until the final season. If you have seen all six Jurassic Park/World movies, you'll probably like this five-season Netflix series. They do not really break any new ground here. It's dinosaurs, more dinosaurs, and children. The kids want to save the dinosaurs, while the dinosaurs want to eat or stampede the children. The adults are about as helpful as the ones in A Series of Unfortunate Events, which is to say they are either evil or incompetent. 

Pros: Dinosaurs! Fairly predictable plot! More dinosaurs! Likeable characters in the main cast of six camp kids. 

Cons: Fairly predictable plot. Kinda scary dinosaur attacks, especially for the young age group this is aimed at (people totally get eaten, not on screen but you see the person and the dinosaur jaws and the camera cuts away with a scream so yeah). But the biggest negative: Romance :( I am not a fan of any children's series pairing up their pre-teens (how old are these kids? I am not sure. But they are not college aged, so that is too young for romance in my opinion). From the beginning there is a popular rich guy and a shallow blogger girl and you just know they're gonna be paired up. But in the final season the production team decided to pair up both a hetero couple and a homo couple and I feel strongly that they should have just left it all as friends. This show could have just been about pre-teens bonding over dinosaurs and crazy escape attempts and it would have been great.

Summary Restated: I recommend the first four seasons but can't recommend the fifth (final) season. 

Next, a movie:

Doctor Strange in the Multiverse of Madness

Summary: Did not like. Would not watch again. Why? Because it was super duper creepy, horror movie style. If horror movies are your thing, maybe you will like it. But it heavily (in my opinion) relies on earlier movies in the MCU (as most in the MCU do at this point), and it influences future movies I'm pretty sure, so you need to be a MCU fan and a horror movie fan. 

Pros: Can't think of any, other than continuing a few stories in the MCU (namely those of Doctor Strange, Scarlett Witch, and a new hero).

Cons: Super duper creepy. Dark magic, zombies, possession, demons, disgusting violence that I didn't watch because they telegraphed what was going to happen so I could disengage until my husband signaled that the gross part was over. I'm glad I didn't watch this one in theaters because I used my phone to escape from the creepiness and grossness of several portions. 

Slight spoilers here: "I am not a monster" says the character who is murdering heroes so she can kidnap a child to sacrifice so she can steal children from a loving home. 

Summary Restated: If horror movies aren't your thing, just get the Spark Notes / Wikipedia summary and enjoy the next MCU movie (not sure what that will be).

Monday, August 1, 2022

Reusable Bag Car Loop Pattern

My state has a bag tax, which means I try to keep some reusable bags in my vehicle. But I don't have a good place for them! My glove box is full of papers, and my doors are full of sunglasses and an armadillo (graduation present from my then-7-yr-old brother). So I made a loop that fits over my gear shift! Here's what I did:
1. Made a chain that fits over my gear shift twice (hold the ends together to make a loop, slide over the shift, twist, slide over again - if there's some wiggle room, you're at the right length!).
2. Slip-stitch the end to the start to make a loop, then single crochet all around. Cut yarn and finish off.

To use, slip the loop over your gear shift. Slide the bags onto the loop (you need the kind of reusable bag that has a little loop for hanging). Loop the loop (haha) back over the gear shift. Secured!

Here's the loop.
Here's the loop on the shifter, with bags slid onto it.
And here's the bag holder holding bags.

Hope this is a helpful addition to your car! 

UPDATE: It's not just for bags! This pattern is what I used to make bootloops / bootstraps for my ski boots and snowboard boots. You loop the loop through the loop on the top back of the boot to hold the boots together for ease of carrying. You can make the loop a little thicker for this (add another round or two of SC) so it's more comfy in your hand, since ski/board boots are not light. 

Saturday, July 30, 2022

Pot Scrubber Crochet Pattern

 Here is a popular crochet pattern, from Maggie's Crochet: Nylon Pot Scrubber.

I made this pattern, but not quite as directed because at first I didn't have a size N hook, then I couldn't find 2" nylon netting. Here's a photo of what I made, with the descriptions below.


Starting on the left, the blue is with Yarn Bee Scrub-ology Scrub It yarn and a size N hook. I bought a new skein for this because I wasn't sure if my leftovers from another project would be enough (I'm fairly certain I only had a few yards left). This yarn is a scrub yarn, so you want to protect your fingers and work slower so you don't rub your skin raw. This skein cost around $4 full price (79yd), and special yarns don't always go on sale with the regular but you can always check!

The yellow and green is with two strands of Yarn Bee Scrub-ology 2.0 yarn, and the yellow is with just one strand. These are using a size K hook. These were made with leftover yarn from another project - you can make a lot of scrubbers with one skein of this yarn! A review HERE says they made 7 scrubbies from one skein but I don't know what type they were making. I don't have a photo of the wrapper for this one since it's leftover yarn, already unwrapped. Same warning as the previous one, work slowly and use a thimble or something to protect your fingers so they don't get rubbed raw. Looks like the pricing is about the same as the other Yarn Bee, so about $4 per skein. I think you can make more out of this one than the other because I'm fairly certain the yardage is a bit longer but I can't find the yardage anywhere. The thinner skeins usually have much more yardage on them. 

Lastly the big green is using 1.5" x 10yd organza 100% nylon ribbon and a size N hook. This one is only one-sided because I ran out of ribbon! Yes, that means you'd need 20yrds of 1.5" ribbon to make one of these scrubbers. That is about $8 of ribbon (full price - please look for sales as craft stuff is always getting discounted). But you actually might need more because I only have a small portion left over (wraps around the spool 3x) and that is probably not enough to connect the two pieces. It might be, combined with the leftover from the second spool you will need, but you'll be tying the ending together so there'll be knots on your border. Not the best. I will add that crocheting with ribbon is annoying. I would charge extra if someone wants an item crocheted out of something that's not yarn.


Thursday, June 2, 2022

Obit for my Sunglasses

sunglasses, old and new

Picture: on the left is my old pair of sunglasses, on the right is my new pair.

Oh my sunglasses, I acquired you way back in my college days circa 2007. I went to Aeropostale with my sister and she got a pair as well, since it was a 2 for $15 deal. I kept you in your little Aero sunglasses microfiber bag in my beloved Eclipse for all the years of her life with me, then moved you to my Jeep where you continued to be worn whenever the sun was shining and I was wearing my contacts rather than my glasses. I had you when my Mark proposed, when I returned after graduating college, when I got married, when I drove daily to my office job for over a decade, and many other milestones!

I was enjoying the sunshine at a playground on Saturday, approximately 15 years after your acquisition, when I heard and felt a POP. I thought a massive bug might have flown into my sunglasses, but alas it was your frame just breaking under the pressure of so many memories together. With the lens no longer securely held, it was time for a successor. I went back to Aeropostale (this time in MD rather than in FL) and acquired a similar pair for only $8, which is impressive that the price only went up $0.50 in over a decade. 

I hope these new glasses last me into the 2040's, only time will tell. 

Monday, May 23, 2022

Turtle Duck Pattern

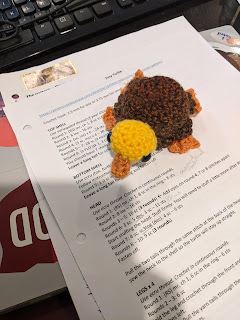
Ok, so have you watched Avatar: The Last Airbender? There is an amazingly cute animal on that show called a turtle duck. Ever since finding a (paid) duckling pattern from Little Conkers, I have wanted to figure out how to make a turtle duck. And I decided to just go for it after finding a turtle pattern from Pink Mouse Boutique! I crocheted this little guy for my little brother who is graduating college (WOW how is my little brother already at that milestone???) so this is scheduled to post after I've given him his gift. I might need to make one for myself as well because it's just too cute. All in all, took about two hours to crochet and assemble.

First off, here are the patterns: 
Duckling from Little Conkers - this one is not free but it is very well written and totally worth a few dollars.
Turtle from Pink Mouse Boutique - this one is free

You will just need the feet (x4) and duck bill from the duckling pattern, then you will make all but the feet from the turtle pattern. Attach the duck bill between the eyes on the face, and attach the duck feet where it says to attach the turtle feet. 

NOTE: with the duck feet, I did NOT do the heel bobble, since we want to attach the feet flat to the turtle, so just skip the bobble. I added a turning chain to keep it smooth. You also don't need a tail on the foot since we are stitching it right in like the turtle pattern says.

I used a 3.5mm hook for both patterns and that made the sizing work out. Which was nice because I did not want to figure out what size hook to use on each pattern to get them proportional. It could be argued that the feet are a little big, but I see that as endearing. The colors were just yellow for the head and belly, orange for the bill and feet, and a variegated brown for the shell. I put in some safety eyes and used a yarn needle to stitch the pieces together.

Finished product:


Monday, May 9, 2022

Pacifier Dangle / Luggage Marker

 There is a very popular brand of pacifier, the Soothie, that works great and does not have anything attached to it, so it's very safe for little babies. But you know what's annoying about a pacifier with nothing attached to it? When you drop it, it disappears. Especially if you have it in light pink and you have light tan carpet. One time, we searched all over our bedroom trying to find this pacifier, only to slip on our slippers in defeat and find it somehow had gotten inside one slipper. How??? Anyways, I crocheted a little dangle that loops onto the classic Soothie so when you drop it you can find it! Also, my baby girl (who is one year old) likes to fiddle with the dangle and can use it to hold her pacifier more easily. What if you don't have the Soothie but rather some other brand? Well as long as it has a hole, handle, or some way to pull the dangle through and wrap around, it will work! If you have something like this, sorry there's nothing to attach the dangle (well there are the corner holes but then the yarn will be pressed against your baby's face and it will get gunky fast and trap moisture which is bad). 


Unattached (above), you can see it has three dangles below the main area which has the loop on top, used to attach to the pacifier. Below, two pacifiers with their dangles (the pink one has the dangle made in this pattern below, the green one is a variation on the pattern). The pink one is attached to the edge of the pacifier which is not the best as it is against the baby's face, i.e. gets gunky fast. But these are easy to detach and wash so that's a plus! 

UPDATE: This pattern can also be used as a luggage tie! To make your bag stand out a little more on the carousel with all the other similarly shaped and colored bags. Pick a vibrant yarn and make your bag distinct! Loop your luggage marker on a zipper and you're good to go.

Pattern:

There is a lot of leeway with this pattern. I wrote it with a 9-stitch main block, but my previous one has more like a 5- or 6-stitch main block. Also, I gave the previous one a longer top loop, maybe like ch30 rather than the ch20 on the pink. Lastly, there are many options with the tendrils. I picked variations from Nicky the NICU Jelly's tentacles, but also have made up some of my own variations. 

Hook: 3.5mm [E/4]

Yarn: I used a slimmer yarn, maybe sports weight, because the hole in the pacifier is not very large. 

Chain 30

Row 1: Turn, 2SC in 2nd stitch from hook and in next 20 [this is a tightly curled tendril], then 1SC in last 9

Row 2: Turn, ch1, 1SC in first 9, ch15 [this is the second tendril]

Row 3: Turn, 1SC in 2nd from hook and all the way to end [straight tendril which will still curl a little]

Row 4: Turn, ch1, 1SC in first 9, ch25

Row 5: Turn, 1SC in 2nd chain from hook, *2HDC in next, 1DC in next, 2HDC in next, 1SC in next* repeat til main area [variation of a curly tendril], 1SC in last 9

Finishing: SC around top corner and across top of piece, then ch20 and attach to opposite corner for the loop. Cut yarn and weave in ends. 

To attach: push the top loop through the hole in the handle of the pacifier, then pull the tendrils through the loop. <-- this is why it's important to not use a bulky yarn or bigger hook. If you want to use either, then just switch to the slimmer/smaller for the loop portion (finishing step).

Variations on tendrils

You can do whatever length you want, and however many you want. With just two it looks a bit slim, and I haven't tried with more than three (might be bulky). The important thing is to keep the main area the same size above each tendril, otherwise it looks a little wonky. 

You can do a bubble pattern, so on the way back up the tendril do *1SC, 1TripleCrochet* repeat til the main area. The Triples will 'pop' out and your kid can fiddle with pushing them back and forth. 

You can vary the curliness by adding or dropping stitches, like in the jellyfish pattern she has *2SC, 1SC* instead of 2SC the whole way back. You also could try 2DC or varying *2DC, 2SC* all the way back. So many options! 

Thursday, April 28, 2022

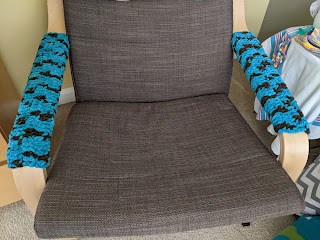
Crochet Pattern: Ikea's Poang Armchair arm covers

Ikea has a popular armchair - the Poang. It works great in your house, specifically in your nursery as the chair has enough give to allow some bounce/rocking when calming your baby. The annoying thing is the arms of this chair - they are hard and it's uncomfortable for your elbow or your baby's head to rest on them. Solution: this pattern to cover said arms of said chair! 

How did I come up with this pattern? I figured a rectangle would work nicely, and went from there.
Is this US or UK? US.
Will this work on the Ikea rocking chair? Not sure - the arm is a little different on that one since the rocking part loops around to it, I will update if I try putting a set of my wraps on the rocker in my church's nursery. UPDATE I have tried it and as long as you leave a long tail for weaving and just skip the part where the two pieces meet under the handle then you're good to go. 

If you want to use a bulkier yarn (I received a few skeins from a friend, not sure the weight but it's very plush), then adjust the starting chain length and number of rows to fit. I used the length of my arm from elbow to fingertip to estimate the length I needed.

Yarn: Super Bulky 6 (see photos below), specifically Bernat Blanket
Hook: 6.5mm, US K 

Starting chain: 45 stitches.
Row 1: Using two of the stitches as the turning stitch, double-crochet across the whole way (43).
Row 2-6: Chain 2 for turning stitch, then double-crochet across the whole way (43).
Row 7: Chain 2, *double-crochet in first stitch, chain 1 and skip 1* repeat between the * to the end, finishing with a double-crochet. LEAVE A LONG TAIL, the length of the piece and then a little extra just to be safe. Cut the thread, pull through last stitch to tie off.
To Finish: Wrap the rectangle lengthwise around the arm of the chair, keeping the seam on top for ease of attachment. Using either a hook or a yarn needle, sew the long sides together using the starting chain on one side and the holes created by the single chains on the other. Pull tightly so the arm cover won't slide around. Tie off at the end and rotate so the seam is underneath the arm of the chair. Tada!

Photos:

The yarn I used - 


Installed on the chair in my home nursery -


The finished product before being installed (neglected to get a photo of the colorful ones before installing so you have a boring black one here, headed for a black/gray chair in my church's nursery, where if I remember I'll try it on a rocker to see if it fits) - 


Wednesday, February 23, 2022

Adventures in Motherhood: Breastfeeding

I had my first kid last year, and I have been able to breastfeed her which is a blessing. It's also extremely, chronically painful. Something I did not know beforehand - it seems very little research has gone into improving breastfeed, namely in the clogged ducts department. Like, they say massage and heat and hope for the best. It's ridiculous. 

I've struggled with clogged ducts since my daughter was born. Many mothers do not get them, or only get them once or twice. I have been getting them nearly weekly, sometimes more, every once in a while less. But through my struggles, many have reached out with advice and I would like to catalog what has helped me here. Obviously everyone is different, all of us are on our own journeys, but I'm writing this down in the hope that it can help someone. 

When my friend heard that I was getting clogs, she recommended Sunflower Lecithin (this supplement), which is a rather big pill (I'm not great with those) but I think it has been a game changer with getting my clogs to move out quicker. Before I started taking this twice daily, my clogs would linger for days on end - after starting it (and taking more on days with clogs), my clogs usually move on after a day or two. UPDATE: It comes in liquid format! It's super thick but I think it's easier to get down than the big pill version. Just make sure to blend it otherwise it's super thin then basically solid.

But that's still a day or two of pain, so my mom sent me a list of things that could be helpful and on it (#12)  was Happy Ducts Lactation Support (this supplement). [The supplement mentioned in the previous point is #13 on this list.] I put a few droppers of it into like a shot of water (it doesn't taste the best, kind of just herby, but I think it's worse to mix it into a drink) when I have a clog and this has really helped to move out clogs in usually the same day they start.

When I feel a duct clogging (hardening lump, feels very obvious), I warm the area with a heating pad my friend made for me - it's basically a beanbag filled with rice. I microwave it for about 15 seconds and place it on the painfilled area. The heat helps sooth the tender area and can help the clog move. I don't have a link for this one, since mine was home-made for me, but I'm sure there are plenty of options out there. You can look in the sports area of a CVS-type store and they should have ice/hot pads - I've heard that cooling the area can be helpful but I have not found that to be true for me. Or you could just fill a clean sock with rice, microwave it, and work with that. 

I alternate between warming the area and massaging the area. Now you can massage with your hand, I did that for the first few months, but dang the area hurts and I kinda feel like I'm hurting myself by messing with it. So my amazing husband found this little massager and it's great. That brand has several types - I have found success with this one so I haven't tried the others. It was a game-changer. It feels nice (the silicone is very smooth and does not catch on my skin or irritate it) and works well to break up the clog so it can be pulled out by either my pump or my baby. It's also water-proof so I can use it in the shower or tub, which means I can have hot water on the area while massaging which is helpful in moving the clog out. 

UPDATE from 2023: So when I wrote this back in 2021, above was the best practice. But now I've been told that you should use cold and not work the area, just treat it like a sore muscle instead? So I've tried doing that and it seems to help? Minimal massaging and using cold rather than hot. What do I use for cold? The packs that come with this very helpful C-section recovery band. The packs can go hot or cold, and when cold they are still flexible. The band itself was way more comfortable than the hospital-provided binders (my hospital seems to only have S or XL and I'm neither). I wore the band when going for walks in the month or so after my surgery - the band helps keep the surgery site stable and protected from clothes rubbing against it. The hot/cold packs fit nicely inside the band and help relieve the pain on the surgery site. 

UPDATE: I found out about these nipple shields and they seem to be helping immensely! I very rarely clog with my second adventure in breastfeeding and I started using them a week before I gave birth (like the instructions say) and it's a fairly simple change with seemingly great results (or maybe my second time nursing is just going way better? It's hard to know).

Dangle feeding is another thing mentioned in that list above and also mentioned by my lactation consultant (my baby's pediatrician's office employs several - check if yours has any!) but I have not noticed success with that.

If you notice inflammation or get a fever, please call your doctor since that could be mastitis and you should get that checked out. 

Hopefully you won't need this advice, but if you're reading this post then you probably do need it, so I hope something here is helpful for you! Reach out to moms you know - mine pray fervently for me as they know the misery that plagues me, and their prayers are an encouragement to me. You are not alone in this! I know the book of Psalms was written by guys, but some of the passages are quite applicable when struggling with this pain. 

One last thought, be mindful of your mental health. I know I get depressed when my chronic pain flairs up, and reaching out to friends for prayers and also reading the Bible help keep my spirits from getting too low. Find what works for you and remember to do it! Stay away from negative sources like the news or people who bring you down - find something that relaxes you to remove excess stress since nobody needs extra stress, especially when you're in pain and have a very needy baby! 


Postscript: How to finish nursing your baby? It was a big question for me because I have had plenty of supply for my whole journey. I started spacing out my baby's feedings as I could and kept spacing them out until I was just feeding her when she got up and when she went to bed. Dropping to just one feeding wasn't too bad, and after a week or so I dropped the lone feeding of the day and my baby was fine with it! But I was not fine with it - I slowly engorged over the next week until the pain was just too much and I had to express it. I then slowly engorged again and had to repeat - I think this happened three times, each time took about a week to get painfully full. I applied peppermint essential oil topically to help with the pain (and it might have reduced my milk supply), and it was not a bad thing. I did stop taking my sunflower supplement since that can increase milk supply and I did not want that.  After about a month, I was good to go! No more leaking, no more engorging, the milk supply is gone! 
UPDATE: On my second adventure, my milk was drying up on its own when I went down to one feeding so I just got a little clogged when I stopped but it alleviated after a few days and no more issues!

Sunday, January 2, 2022

Time, Gone

In my rather short career (ten years of software engineering), I have lost two coworkers to unexpected heart attacks. He was at work one day, and gone the next. She was on the mend one day, and gone the next. In both cases, I had already moved off the teams but I keep in contact with several of my previous teammates. Thankfully, someone else on the team reached out to me to let me know personally each time (thank you, Jacob and Stephanie).

The most recent loss was at the very end of 2021. She was only in her 40's. I had been meaning to reach out to her to plan a tea meetup, maybe at Baltimore Coffee and Tea, and introduce my daughter to her or just catch up on each other's lives. I thought I had more time.

Reading the Bible is good. This is how you learn more about God and how to be transformed into His image. But sharing what you know is also important - knowledge is not for hoarding. One of the last times I talked with my friend, she was curious about eternal security - something evangelical Christians have but Catholics do not. I wanted to continue that conversation with her, but now I never can. I ran out of time.

What is eternal security? It is believing that the saving power of Jesus' sacrifice on the cross is enough, and it is all you need to have your name written in the Book of Life. No works of righteousness needed (Ephesians 2:8-9), no added sacraments (Romans 3:20). Once you accept Jesus' gift of eternal life, the sting of the grave is gone (1 Corinthians 15:55-57). You still need to ask forgiveness for new sins (Romans 6:1-2), as you will keep sinning as long as we are on this fallen world, but you need not worry about eternal damnation (Romans 8:38-39). As you listen to the indwelling Holy Spirit, you will desire to be more like Christ and therefore do acts of righteousness as He leads, but these do not earn your way into heaven. There are many resources that explain this better than I can. Please look at a selection of them here:
https://www.gotquestions.org/eternal-security.html